Tracking Device Motion
Submitted by Leonard Daly on Thu, 03/10/2016 - 20:26
 |
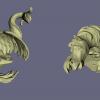
| Credit: Runner1928. Details |
In a previous post (3D Google Cardboard), I wrote about the code necessary to perform a split screen operation. This post covers how to track the rotation motion of your device (phone or tablet) and change the viewpoint so the entire object is visible. This example works for a single object that you "look at", not an environment where you "look around". The necessary JavaScript is on GitHub along with an example of how it is used. This is the same code that is used for the Models and was disussed in the post Stereoscopic Model Views.
Before beginning on the development effort, it would be good to check out the post "Check Mobile Orientation" to ensure that the target device is responding correctly. This should work without an issue on any recent phone or tablet. If it does not report as indicated in the post, you may need to make some adjustments to the code to make it work on your device.
External resources for the HTML file are
- x3dom.js
- x3dom.css
- jQuery.js
- display.js
- YourModel.x3d
This article will discuss how to use display.js and the additional code needed in your HTML file. display.js is a prototype version for this capability. It is likely to change substantially over time. Any significant changes to functionality or calling signature will be done with a new name to preserve the old features. YourModel.x3d is shown Inline in the example. It could just as easily be inserted into the HTML. If that is done, only the model should be included. Ideally, the origin for the model is at the center of the model. This makes the rotations look more natural. If the model is not centered, the example code includes a repositioning Transform.
The library and example are available on githib at https://github.com/DrX3D/mobile-orientation with the MIT license.
The HTML file assumes that all external resources are located in the same directory as the HTML file. You can easily substitute a different URL for all resources except the model. Make sure that is in the same or subdirectory as the HTML file.
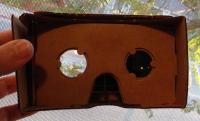
There is a button that is shown in the browser that instructs the display to go full screen. This is needed to correctly view the display using Cardboard, but it is not necessary for development. jQuery is used for button control.
Note: HTML and X3D code blocks are in fixed format. Node, attributes, and field names are bold. Attribute/field values are italic.
The X3D section of the HTML file is:
<x3d id='x3dElement' ...>
    <scene id='scene'>
        <navigationInfo headlight='TRUE' type='"EXAMINE" "WALK"'></navigationInfo>
        <viewpoint centerOfRotation='0 0 0' position='0 0 10'></viewpoint>
        <background DEF='bgnd' skyColor="0.4 0.4 0.5"></background>
        <group id='root' render='true'>
            <group DEF='theScene'>
                ...
            </group>
        </group>

        <group DEF='left'>
            ...
        </group>
        <group DEF='right'>
            ...
        </group>
    </scene>
</x3d>
The contents of the DEF nodes 'left' and 'right' were discussed in the 3D Google Cardboard article. This article will concern itself with the remainder of the X3D scene and the JavaScript necessary to capture the motion.
The fields in NavigationInfo and Viewpoint can be adjusted to account for your particular model. If you model is prelit, then the headlight should be FALSE. Similarily the position field can be modified so that the model is in view. This is mostly to be a scale change depending on the units used for the model.
The Group node 'theScene' contains all of the necessary Transforms to cahnge the model. This example works by leaving the camera in a fixed position and rotating the model. This is "look at" mode. "Look Around" mode would leave the model fixed and the camera would adjust.
Focusing in on the 'theScene' Group node:
<group DEF='theScene'>
    <Transform id='orient-spin' DEF='RotateObjectAlpha' rotation='0 1 0 0' translation='0 0 0'>
        <Transform id='orient-tilt' DEF='RotateObjectGamma' rotation='0 1 0 0' translation='0 0 0'>
            <Transform id='orient-compass' DEF='RotateObjectBeta' rotation='0 1 0 0' translation='0 0 0'>
                <Transform DEF='Reposition' translation='0 0 0'>
                    <Inline url='YourModel.x3d'></Inline>
                </Transform>
            </Transform>
        </Transform>
    </Transform>
</group>
It is not necessary to include the defaults for any of these transforms. It was done to ensure things lined up initially. The Reposition Transform handles the case when the center of the model is not at the origin. This is a shift in space that improves the user's experience. The DEF names of each Transform node correspond to the rotation coordinates of the device. The id values are used when defining the orientation. These values must match those used when creating DeviceDisplay. The display.js code handles all of the work in translating from the device orientation coordinates to those suitable for the X3D display.
The Inline node loads in your model. You can replace this node with the model's X3D code. It would usually start with Transform, Group, or Shape node.
At the end of the HTML file (prior to the closing body tag) is the code for loading display.js and setting up the interaction.
<script type="text/javascript" src="display.js"></script>
<script type="text/javascript">
cb = new DeviceDisplay ('x3dElement', 'orient-compass', 'orient-tilt', 'orient-spin', 'Shapes', true, 'rtLeft', 'rtRight');
document.onload = function() {loadStereographic(cb); fullscreen(cb);};
jQuery("#goFullScreen").click(function() {fullscreen(cb);});
</script>
The first script tag loads in the external JavaScript. The second script tag is code that connects the X3D scene components to the orientation controller. The first four arguments ('x3dElement', 'orient-compass', 'orient-tilt', 'orient-spin') reference the id values from the X3D scene. The first one being the X3D tag, and the other three are the rotation transforms. The fifth argument ('Shapes') is a label for this orientation management. It is required, but the value is not important. The sixth argument (true) indicates that the orientation controller is to be active. If this is not true, then nothing will happen. The last two arguments are the id values of the left and right eye rendering. See the article (3D Google Cardboard for more details.
The second line tells the browser to load the orientation controller (loadStereographic) and go full screen. Not all browsers can go full screen this manner. The third line handles all button interactions in a browser-independent manner.
To summarize the steps
- Add the reference to load x3dom (.js and .css)
- Add the X3D code to set up the camera and background
- Add the X3D code to handle the device orientation rotations
- Add the X3D code for the model or use an Inline to load it
- Add the X3D code for left/right display split
- Add the HTML/JavaScript code to load the device orientation library
- Add the HTML/JavaScript code to activate the device orientation controller and manage the device orientation changes to reflect in the scene
That is all that is necessary. For large models this puts a very large load on your device's browser. It may crash. Make the model smaller and/or less complex is the best solution.
This work is comprised stereographic split-screen shader code provided by Fraunhofer and device orientation tracking based on work done by Fraunhofer (classroom example).